Kubernetes Setting up Role-Based Access Control(RBAC)
by Anish
Posted on Thursday February 7, 2019
Introduction
You define your RBAC permissions by creating objects from the rbac.authorization.k8s.io API group in your cluster. You can create the objects using the kubectl command-line interface, or programmatically.
You'll need to create two kinds of objects:
- A
RoleorClusterRoleobject that defines what resource types and operations are allowed for a set of users. - A
RoleBindingorClusterRoleBindingthat associates theRole(orClusterRole) with one or more specific users.
RBAC permissions are purely additive there are no "deny" rules. When structuring your RBAC permissions, you should think in terms of "granting" users access to cluster resources.
The LAB
In this LAB exercise we are going to run the below use case
- Create namespaces dev and stag
- Create two user names user1 and user2
- user1 belongs to dev namespace
- user2 belongs to stage namespace
- user1 and user2 defined with Role and RoleBinding
- user1 created busybox pod in dev namespace
- user2 created busybox pod in stage namespace
- user1 tried to access busybox pod in stage namespace Access Denied (Valid Use case)
- user2 tried to access busybox pod in dev namespace Access Denied (Valid Use case)
- user1 can query pods in dev namespace (Valid Use case)
- user2 can query pod in stage namespace (Valid Use case)
1. Creating dev and stage namespace
To learn more about namespaces go here
root@kube-master:# kubectl create namespace dev
namespace/dev created
root@kube-master:# kubectl create namespace stage
namespace/stag created
2. Creating user1
- To create user1 generate RSA keys for user1 create CSR and get it singed with kubernetes rootCA and rootCA private key
root@kube-master:# openssl genrsa -out user1.key 2048
Generating RSA private key, 2048 bit long modulus
..................................................................................+++
.................+++
e is 65537 (0x10001)
Generate the CSR
root@kube-master:# openssl req -new -key user1.key -out user1.csr -subj "/CN=user1/O=8gwifi.org"
Sign the CSR and create the user1 x.509 certificate , sign CSR with the kubernetes rootCA and rootCA key which usually present in the /etc/kubernetes/pki/ location.
root@kube-master:# openssl x509 -req -in user1.csr -CA /etc/kubernetes/pki/ca.crt -CAkey /etc/kubernetes/pki/ca.key -CAcreateserial -out user1.crt -days 365
Signature ok
subject=/CN=user1/O=8gwifi.org
Getting CA Private Key
update the kubernetes config and define set-credentials and set-context for user1
root@kube-master:# kubectl config set-credentials user1 --client-certificate=user1.crt --client-key=user1.key
User "user1" set.
root@kube-master:# kubectl config set-context dev --cluster=kubernetes --namespace=dev --user=user1
Context "dev" modified.
3. Creating user2
Repeat the same process for creating user2 in kubernetes cluster
openssl genrsa -out user2.key 2048
openssl req -new -key user2.key -out user2.csr -subj "/CN=user2/O=8gwifi.org"
openssl x509 -req -in user2.csr -CA /etc/kubernetes/pki/ca.crt -CAkey /etc/kubernetes/pki/ca.key -CAcreateserial -out user2.crt -days 365
update the kubernetes config and define set-credentials and set-context for user2
kubectl config set-credentials user2 --client-certificate=user2.crt --client-key=user2.key
kubectl config set-context stage --cluster=kubernetes --namespace=stage --user=user2
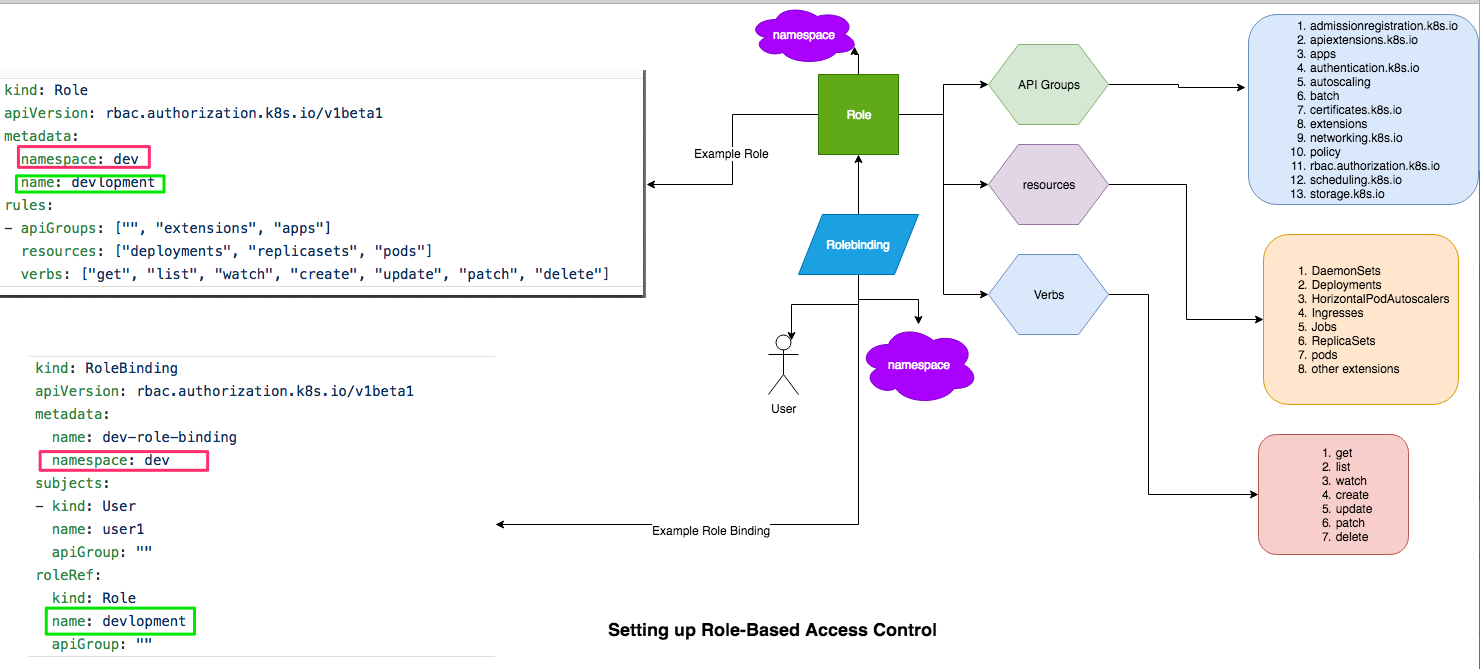
4. Create Role and Rolebinding for user1
Creating role
Create role in dev namespace, In this yaml file we are creating the rule that allows a user to execute operations like deployments,replicasets,pods
kind: Role
apiVersion: rbac.authorization.k8s.io/v1beta1
metadata:
  namespace: dev
  name: devlopment
rules:
- apiGroups: ["", "extensions", "apps"]
  resources: ["deployments", "replicasets", "pods"]
  verbs: ["get", "list", "watch", "create", "update", "patch", "delete"]
Apply this role in kubernetes cluster
root@kube-master:# kubectl create -f dev-role.yaml
role.rbac.authorization.k8s.io/devlopment created
Bind this role to user1
Binding the user1 to the Role:devlopment
kind: RoleBinding
apiVersion: rbac.authorization.k8s.io/v1beta1
metadata:
  name: dev-role-binding
  namespace: dev
subjects:
- kind: User
  name: user1
  apiGroup: ""
roleRef:
  kind: Role
  name: devlopment
  apiGroup: ""
Apply this rolebinding in kubernetes cluster
root@kube-master:# kubectl create -f  dev-role-binding.yaml
rolebinding.rbac.authorization.k8s.io/dev-role-binding created
5. Create Role and Rolebinding for user2
Repeat the same process for user2, in the stage namespace, creating role in stage namespace
kind: Role
apiVersion: rbac.authorization.k8s.io/v1beta1
metadata:
  namespace: stage
  name: staging
rules:
- apiGroups: ["", "extensions", "apps"]
  resources: ["deployments", "replicasets", "pods"]
  verbs: ["get", "list", "watch", "create", "update", "patch", "delete"]
Apply the role in k8 cluster
kubectl create -f stage-role.yaml
Create rolebinding for user2
kind: RoleBinding
apiVersion: rbac.authorization.k8s.io/v1beta1
metadata:
  name: stage-role-binding
  namespace: stage
subjects:
- kind: User
  name: user2
  apiGroup: ""
roleRef:
  kind: Role
  name: staging
  apiGroup: ""
kubectl create -f stage-role-binding.yaml
6. Verify Roles and RoleBindings
Verify the namespace points to correct role,rolebindings and users
root@kube-master:# kubectl get roles -n dev
root@kube-master:# kubectl get roles -n stage
root@kube-master:# kubectl get rolebinding -n stage
root@kube-master:# kubectl get rolebinding -n dev
root@kube-master:# kubectl describe rolebinding dev-role-binding -n dev
Name:         dev-role-binding
Labels:       <none>
Annotations:  <none>
Role:
  Kind:  Role
  Name:  devlopment
Subjects:
  Kind  Name   Namespace
  ----  ----   ---------
  User  user1
root@kube-master:# kubectl describe rolebinding stage-role-binding -n stage
Name:         stage-role-binding
Labels:       <none>
Annotations:  <none>
Role:
  Kind:  Role
  Name:  staging
Subjects:
  Kind  Name   Namespace
  ----  ----   ---------
  User  user2
8. Launch busybox pods in the respective namespace
In practical you can luanch any deployment here, the busybox is choosen for testing purpose only
apiVersion: v1
kind: Pod
metadata:
  name: busybox
spec:
  containers:
  - image: busybox
    command:
      - sleep
      - "3600"
    imagePullPolicy: IfNotPresent
    name: busybox
  restartPolicy: Always
Creating busybox pods in stage and dev namespaces
root@kube-master:# kubectl create -f busybox.yaml -n stage
pod/busybox created
root@kube-master:# kubectl create -f busybox.yaml -n dev
pod/busybox created
9. Testing RBAC
While creating user1 and user2 the config context are set, verify it's working as desired, this is also used for RBAC troubleshootings.
root@kube-master:# kubectl config get-contexts
CURRENT   NAME                          CLUSTER      AUTHINFO           NAMESPACE
          dev                           kubernetes   user1              dev
*         kubernetes-admin@kubernetes   kubernetes   kubernetes-admin
          stage                         kubernetes   user2              stage
- Valid Use case by using dev and stage context both user1 and user2 will see their respective pods
root@kube-master:# kubectl --context=dev get pods
NAME      READY     STATUS    RESTARTS   AGE
busybox   1/1       Running   0          4m
root@kube-master:# kubectl --context=stage get pods
NAME      READY     STATUS    RESTARTS   AGE
busybox   1/1       Running   0          4m
- Valid use case, user2 will be forbidden to check on dev context
root@kube-master:# kubectl --context=dev get pods --user=user2
No resources found.
Error from server (Forbidden): pods is forbidden: User "user2" cannot list pods in the namespace "dev"
- Valid use case user1 will be forbidden to access stage context
root@kube-master:# kubectl --context=stage get pods --user=user1
No resources found.
Error from server (Forbidden): pods is forbidden: User "user1" cannot list pods in the namespace "stage"
Video Demo
Thanku for reading !!! Give a Share for Support
Your Support Matters!
Instead of directly asking for donations, I'm thrilled to offer you all nine of my books for just $9 on leanpub By grabbing this bundle you not only help cover my coffee, beer, and Amazon bills but also play a crucial role in advancing and refining this project. Your contribution is indispensable, and I'm genuinely grateful for your involvement in this journey!
Any private key value that you enter or we generate is not stored on this site, this tool is provided via an HTTPS URL to ensure that private keys cannot be stolen, for extra security run this software on your network, no cloud dependency
Kubernetes Related Topics
Linux Related Topics
Ansible Related Topics
Openstack Articles
Applied Cryptography Topics
Web Crypto API Topics
python Cryptography Topics
PHP Cryptography Topics
Topics
For Coffee/ Beer/ Amazon Bill and further development of the project Support by Purchasing, The Modern Cryptography CookBook for Just $9 Coupon Price
Kubernetes for DevOps
Hello Dockerfile