container runtime runc,containerd,rkt,docker,cri
by Anish
Posted on Monday November 04-2019
To run containers in Pods, we need to uses a container runtime. Here various runtimes by popularity (The popularity measured ny number of questions posted in stackoverflow.)
- Docker : The most popular container runtime needs no Introduction
- lxc : LXC is the well known set of tools, templates, library and language bindings. It's pretty low level, very flexible and covers just about every containment feature supported by the upstream kernel.
- containerd
- runc : RunC is a container runtime originally developed as part of Docker and later extracted out as a separate open source tool and library. Gaining Popularity day-by-day
- CRI-O : Lightweight container runtime for kubernetes
- frakti : The hypervisor-based container runtime for Kubernetes.
- rkt : CoreOS application container engine developed for modern production cloud-native environments
Too many container runtime means to many standard to follow and developers/maintainer will have hard time to maintain it across the Infrastructure.
This opportunity has given birth to Open Container Initiative (OCI). There are currently two specifications in development and in use: Runtime Specification (runtime-spec) and the Image Specification (image-spec).
Well coming back to containers runtime Let's break this in two parts
- Low level container runtime : This involves running a specialized tool that configures the kernel to run the container like runc,rkt
- High Level container runtime : like Docker, CRI-O, containerd and come with developer functionality. They are API driven.
RunC
runC is a low-level container runtime and an implementation of the Open Container Initiative specification. runC exposes and expects a user to understand low-level details of the host operating system and configuration. runC does not have a centralized daemon, and, given a properly configured “OCI bundle”, can be integrated with init systems such as upstart and systemd
In order to use runc you must have your container in the format of an OCI bundle. If you have Docker installed you can use its export method to acquire a root filesystem from an existing Docker container.
Example: Creating nginx OCI Bundle
- To Create an OCI bundle we need root filesystem
- Once rootfs is downloaded or extracted from existing image,
runcprovides aspeccommand to generate a base template spec nameconfig.json
First Get runc
For Fedora/Centos7+/RHEL7.5+
yum -y install runc
Once runc is installed create root file system, In this example nginx rootfs is extracted using the docker command
[root@localhost ~]# mkdir nginx
[root@localhost ~]# cd nginx/
[root@localhost nginx]# mkdir rootfs
[root@localhost nginx]# docker export $(docker create nginx) | tar -C rootfs -xvf -
Generate the spec file.
[root@localhost nginx]# runc spec
After successfull run of the above command config.json is created.
[root@localhost nginx]# ls -ltr
total 4
drwxr-xr-x. 21 root root  242 Oct 31 06:57 rootfs
-rw-r--r--.  1 root root 2618 Oct 31 06:58 config.json
Content of the config.json file
OCI version, operating system and architecture, and terminal settings:
[root@localhost nginx]# cat config.json
{
    "ociVersion": "1.0.1-dev",
    "process": {
        "terminal": true,
        "user": {
            "uid": 0,
            "gid": 0
        },
        "args": [
            "sh"
        ],
        "env": [
            "PATH=/usr/local/sbin:/usr/local/bin:/usr/sbin:/usr/bin:/sbin:/bin",
            "TERM=xterm"
        ],
        "cwd": "/",
Next we have capabilities, which are permissions for executable files in given subsystems that lack root permissions
        "capabilities": {
            "bounding": [
                "CAP_AUDIT_WRITE",
                "CAP_KILL",
                "CAP_NET_BIND_SERVICE"
            ],
            "effective": [
                "CAP_AUDIT_WRITE",
                "CAP_KILL",
                "CAP_NET_BIND_SERVICE"
            ],
            "inheritable": [
                "CAP_AUDIT_WRITE",
                "CAP_KILL",
                "CAP_NET_BIND_SERVICE"
            ],
            "permitted": [
                "CAP_AUDIT_WRITE",
                "CAP_KILL",
                "CAP_NET_BIND_SERVICE"
            ],
            "ambient": [
                "CAP_AUDIT_WRITE",
                "CAP_KILL",
                "CAP_NET_BIND_SERVICE"
            ]
        },
Next we have resource Limits with hard and soft limits configured.
        "rlimits": [
            {
                "type": "RLIMIT_NOFILE",
                "hard": 1024,
                "soft": 1024
            }
        ],
        "noNewPrivileges": true
    },
RootFS
    "root": {
        "path": "rootfs",
        "readonly": true
    },
    "hostname": "runc",
    "mounts": [
        {
            "destination": "/proc",
            "type": "proc",
            "source": "proc"
        },
        {
            "destination": "/dev",
            "type": "tmpfs",
            "source": "tmpfs",
            "options": [
                "nosuid",
                "strictatime",
                "mode=755",
                "size=65536k"
            ]
        },
        {
            "destination": "/dev/pts",
            "type": "devpts",
            "source": "devpts",
            "options": [
                "nosuid",
                "noexec",
                "newinstance",
                "ptmxmode=0666",
                "mode=0620",
                "gid=5"
            ]
        },
        {
            "destination": "/dev/shm",
            "type": "tmpfs",
            "source": "shm",
            "options": [
                "nosuid",
                "noexec",
                "nodev",
                "mode=1777",
                "size=65536k"
            ]
        },
        {
            "destination": "/dev/mqueue",
            "type": "mqueue",
            "source": "mqueue",
            "options": [
                "nosuid",
                "noexec",
                "nodev"
            ]
        },
        {
            "destination": "/sys",
            "type": "sysfs",
            "source": "sysfs",
            "options": [
                "nosuid",
                "noexec",
                "nodev",
                "ro"
            ]
        },
        {
            "destination": "/sys/fs/cgroup",
            "type": "cgroup",
            "source": "cgroup",
            "options": [
                "nosuid",
                "noexec",
                "nodev",
                "relatime",
                "ro"
            ]
        }
    ],
Next We have Linux FS,resources, namespaces masked PATHS
    "linux": {
        "resources": {
            "devices": [
                {
                    "allow": false,
                    "access": "rwm"
                }
            ]
        },
        "namespaces": [
            {
                "type": "pid"
            },
            {
                "type": "network"
            },
            {
                "type": "ipc"
            },
            {
                "type": "uts"
            },
            {
                "type": "mount"
            }
        ],
        "maskedPaths": [
            "/proc/kcore",
            "/proc/latency_stats",
            "/proc/timer_list",
            "/proc/timer_stats",
            "/proc/sched_debug",
            "/sys/firmware",
            "/proc/scsi"
        ],
        "readonlyPaths": [
            "/proc/asound",
            "/proc/bus",
            "/proc/fs",
            "/proc/irq",
            "/proc/sys",
            "/proc/sysrq-trigger"
        ]
    }
}
Running Containers
To run the container use runc run mycontainerid
For example
[root@localhost nginx]# runc run nginx
# pwd
/
Managing Lifecycle
This can be achieved by modifying config.json file and setting process "terminal": true
- Create Container
cd nginx
runc create nginx
- View Container
# view the container is created and in the "created" state
runc list
- List Container
[root@localhost nginx]# runc list
ID          PID         STATUS      BUNDLE        CREATED                          OWNER
nginx       5677        created     /root/nginx   2019-10-31T11:28:12.529241754Z   root
- Start Container
# start the process inside the container
runc start nginx
[root@localhost nginx]# runc list
ID          PID         STATUS      BUNDLE        CREATED                          OWNER
nginx       5677        running     /root/nginx   2019-10-31T11:28:12.529241754Z   root
- Pause the container
runc pause nginx
[root@localhost nginx]# runc list
ID          PID         STATUS      BUNDLE        CREATED                          OWNER
nginx       5677        paused      /root/nginx   2019-10-31T11:28:12.529241754Z   root
- Resume the container
[root@localhost nginx]# runc resume nginx
[root@localhost nginx]# runc list
ID          PID         STATUS      BUNDLE        CREATED                          OWNER
nginx       5677        running     /root/nginx   2019-10-31T11:28:12.529241754Z   root
- state of the Container
[root@localhost nginx]# runc state nginx
{
"ociVersion": "1.0.1-dev",
"id": "nginx",
"pid": 5677,
"status": "running",
"bundle": "/root/nginx",
"rootfs": "/root/nginx/rootfs",
"created": "2019-10-31T11:28:12.529241754Z",
"owner": ""
}
- delete the container
runc stop nginx
runc delete nginx
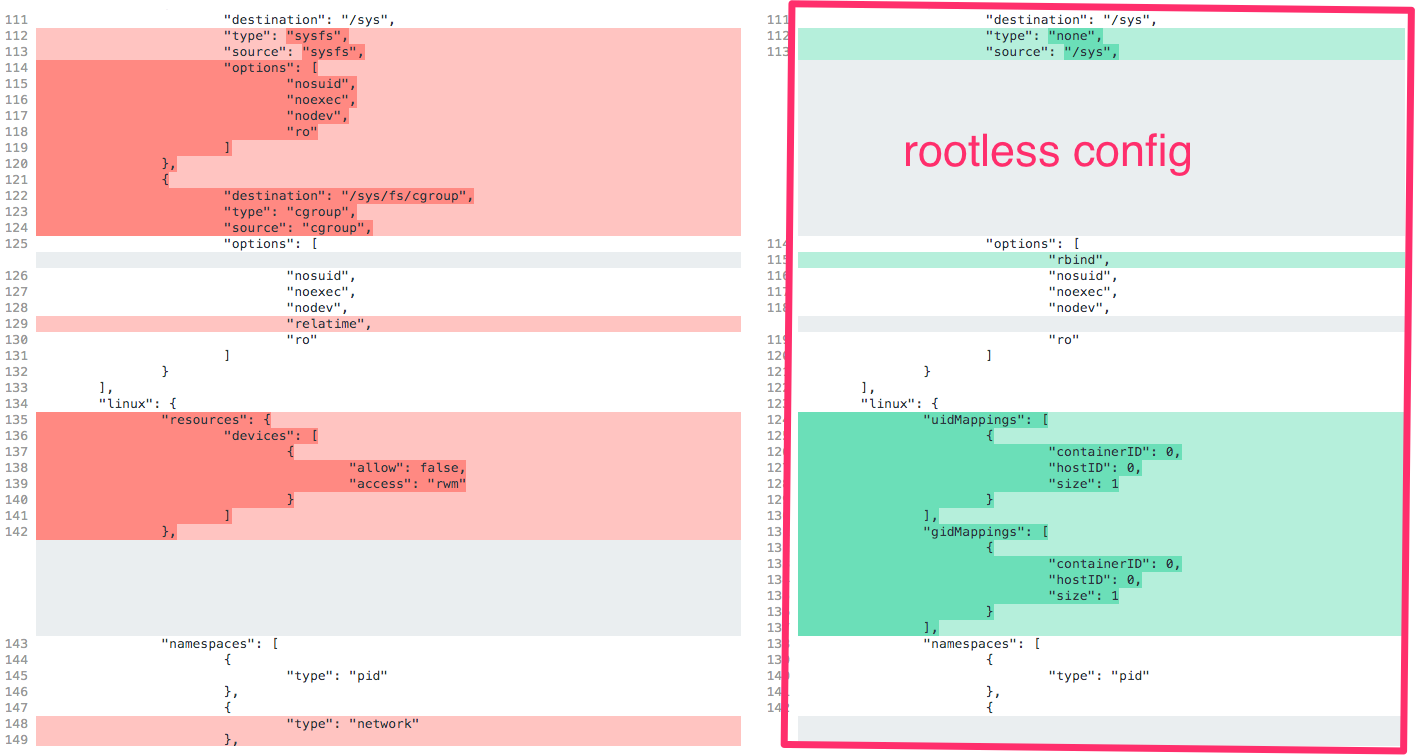
Rootless containers
runc has the ability to run containers without root privileges. This is called rootless. The --rootless parameter instructs runc spec to generate a configuration for a rootless container, which will allow you to run the container as a non-root user.
CRI containerd
containerd is a daemon to control runC. It has a command-line tool called ctr which is used to interact with the containerd daemon. This makes the containerd process model similar to that of the Docker process model
CRI is Containerd Plugin for Kubernetes Container Runtime Interface
To Install CRI containerd in Centos7/Fedora Like system
yum -y install libseccomp
wget https://storage.googleapis.com/cri-containerd-release/cri-containerd-1.2.4.linux-amd64.tar.gz
tar --no-overwrite-dir -C / -xzf cri-containerd-1.2.4.linux-amd64.tar.gz
systemctl start containerd
Check the status
[root@localhost ~]# systemctl status containerd
● containerd.service - containerd container runtime
   Loaded: loaded (/etc/systemd/system/containerd.service; disabled; vendor preset: disabled)
   Active: active (running) since Sun 2019-11-03 11:09:59 EST; 5s ago
     Docs: https://containerd.io
  Process: 1696 ExecStartPre=/sbin/modprobe overlay (code=exited, status=0/SUCCESS)
 Main PID: 1701 (containerd)
    Tasks: 9
   Memory: 17.4M
   CGroup: /system.slice/containerd.service
           └─1701 /usr/local/bin/containerd

Nov 03 11:10:00 localhost.localdomain containerd[1701]: time="2019-11-03T11:10:00.273591789-05:00" level=info msg="Connect contain...rvice"
Follow the instructions to install kubeadm, kubelet and kubectl.
Create the systemd drop-in file /etc/systemd/system/kubelet.service.d/0-containerd.conf:
[Service]
Environment="KUBELET_EXTRA_ARGS=--container-runtime=remote --runtime-request-timeout=15m --container-runtime-endpoint=unix:///run/containerd/containerd.sock"
And reload systemd configuration:
systemctl daemon-reload
Bring Up the Cluster
Now you should have properly installed all required binaries and dependencies on each of your node.
RKT
RKT: A security-minded, standards-based container engine, by default, rkt expects our images to be signed. rkt can download, cryptographically verify, and run application container images. It is not designed to run “full system containers” but instead individual applications such as web apps, databases, or caches. As rkt does not have a centralized daemon it can be integrated with init systems such as upstart and systemd.
How to install RKT ?
Caution: This RPM is not signed yet used this for testing only.
cat <<EOF > /etc/yum.repos.d/kubernetes.repo
[kubernetes]
name=Kubernetes
baseurl=https://packages.cloud.google.com/yum/repos/kubernetes-el7-x86_64
enabled=1
gpgcheck=0
repo_gpgcheck=0
gpgkey=https://packages.cloud.google.com/yum/doc/yum-key.gpg https://packages.cloud.google.com/yum/doc/rpm-package-key.gpg
EOF

yum -y install rkt
Install acbuild for building the Image.
wget https://github.com/containers/build/releases/download/v0.4.0/acbuild-v0.4.0.tar.gz
tar xvf acbuild-v0.4.0.tar.gz
export PATH=$PATH:./acbuild-v0.4.0/
Create A Hello World Go Application
package main

import (
    "log"
    "net/http"
)
func main() {
    http.HandleFunc("/", func(w http.ResponseWriter, r *http.Request) {
        log.Printf("request from %v\n", r.RemoteAddr)
        w.Write([]byte("hello\n"))
    })
    log.Fatal(http.ListenAndServe(":5000", nil))
}
Build the Hello Application with statically compiled.
[root@localhost hello]# go build
[root@localhost hello]# ls -ltr
total 7280
-rw-r--r--. 1 root root     257 Nov  3 11:58 hello.go
-rwxr-xr-x. 1 root root 7450510 Nov  3 12:03 hello
[root@localhost hello]# CGO_ENABLED=0 go build -ldflags '-extldflags "-static"'
[root@localhost hello]# file hello
hello: ELF 64-bit LSB executable, x86-64, version 1 (SYSV), statically linked, not stripped
OCI Image spec build with acbuild
[root@localhost hello]# acbuild begin
[root@localhost hello]# acbuild set-name 8gwifi.org/hello
[root@localhost hello]# acbuild copy hello /bin/hello
[root@localhost hello]# acbuild set-exec /bin/hello
[root@localhost hello]# acbuild port add www tcp 5000
[root@localhost hello]# acbuild label add version 0.0.1
[root@localhost hello]# acbuild label add arch amd64
[root@localhost hello]# acbuild label add os linux
[root@localhost hello]# acbuild annotation add authors "Anish Nath @anish2good"
[root@localhost hello]# acbuild write hello-0.0.1-linux-amd64.aci
[root@localhost hello]# acbuild end
Launch a local application image
[root@localhost hello]# rkt --insecure-options=image run hello-0.0.1-linux-amd64.aci
[root@localhost ~]# rkt list
UUID        APP IMAGE NAME      STATE   CREATED     STARTED     NETWORKS
681a80a5    hello   8gwifi.org/hello:0.0.1  running 1 minute ago    1 minute ago    default:ip4=172.16.28.2
Test the Image.
[root@localhost ~]# curl 172.16.28.2:5000
hello
To remove the container
[root@localhost ~]# rkt stop 681a80a5
"681a80a5-71a0-4e74-ac1c-4cb2acb6132f"
[root@localhost ~]# rkt list
UUID        APP IMAGE NAME      STATE   CREATED     STARTED     NETWORKS
681a80a5    hello   8gwifi.org/hello:0.0.1  exited  10 minutes ago  10 minutes ago
[root@localhost ~]# rkt rm 681a80a5
"681a80a5-71a0-4e74-ac1c-4cb2acb6132f
That's ALL (Nope )
Next Reading : Creating Docker Base Images
Thanku for reading !!! Give a Share for Support
Your Support Matters!
Instead of directly asking for donations, I'm thrilled to offer you all nine of my books for just $9 on leanpub By grabbing this bundle you not only help cover my coffee, beer, and Amazon bills but also play a crucial role in advancing and refining this project. Your contribution is indispensable, and I'm genuinely grateful for your involvement in this journey!
Any private key value that you enter or we generate is not stored on this site, this tool is provided via an HTTPS URL to ensure that private keys cannot be stolen, for extra security run this software on your network, no cloud dependency
Linux Related Topics
Ansible Related Topics
Kubernetes Related Topics
Openstack Articles
Applied Cryptography Topics
Web Crypto API Topics
python Cryptography Topics
PHP Cryptography Topics
Topics
For Coffee/ Beer/ Amazon Bill and further development of the project Support by Purchasing, The Modern Cryptography CookBook for Just $9 Coupon Price
Kubernetes for DevOps
Hello Dockerfile