kubernetes Installation on centos7/RHEL77/Ubuntu 16.04+
by Anish
Posted on Wednesday July 11, 2018
Introduction
This sample chapter extracted from the book, Kubernetes for DevOps .
Get this book on Just $9 or Ask Author for Discount
In this section we will learn how to install kubernetes in centos7/rhel7/ubuntu like system
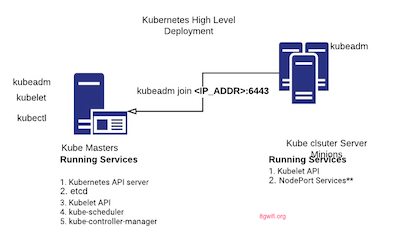
Prerequisite Machines
- Ubuntu 16.04+
- CentOS 7
- RHEL 7
- 2 GB or more of RAM per machine (any less will leave little room for your apps)
Setup Environment
| Master          | Minion Cluster    |
|-------------    |----------------   |
| kube-master     | kube-minion-1     |
Steps Required to Install Kubenetes-master and Kubenetes-minion
| Requirement                                        | Kubenetes-master  | Kubenetes-minion  |
|------------------------------------------------    |------------------ |------------------ |
| Disable system swap and SELinux                    | Y                 | Y                 |
| remove any swap entry from /etc/fstab              | Y                 | Y                 |
| net.bridge.bridge-nf-call-iptables is set to 1     | Y                 | Y                 |
| Install Docker & enable on restart             | Y                 | Y                 |
| Install kubeadm                                    | Y                 | Y                 |
| Install kubelet                                    | Y                 | N                 |
| Install kubectl                                    | Y                 | N                 |
| Configure docker cgroupsfs                         | Y                 | N                 |
| Creating Network Addons (flannel/Calico)           | Y                 | N                 |
Step-1 Disable system swap run swapoff -a this will immediately disable swap and remove any swap entry from /etc/fstab
Step-2 Disable SE Linux by setenforce 0
Step-4 You should ensure net.bridge.bridge-nf-call-iptables is set to 1 in your sysctl config
cat <<EOF >  /etc/sysctl.d/k8s.conf
net.bridge.bridge-nf-call-ip6tables = 1
net.bridge.bridge-nf-call-iptables = 1
EOF
sysctl --system
Step-5 Install Docker & enable on restart CentOS7&RHEL7
yum -y update
yum install -y docker
Step-5.1 Install Docker & enable on restart Ubuntu
apt-get update
apt-get install -y docker.io
start and enable Docker Service and check docker service is running
systemctl start docker
systemctl enable docker
systemctl status docker
Step-6 kubernetes Installation starts here
You will install these packages on all of your machines:
- kubeadm: the command to bootstrap the cluster.
- kubelet: the component that runs on all of the machines in your cluster and does things like starting pods and containers.
- kubectl: the command line util to talk to your cluster.
kubernetes installation on centos7/rhel7
Setting up Kubernetes yum repository on centos6.x/rhel7.x
cat <<EOF > /etc/yum.repos.d/kubernetes.repo
[kubernetes]
name=Kubernetes
baseurl=https://packages.cloud.google.com/yum/repos/kubernetes-el7-x86_64
enabled=1
gpgcheck=1
repo_gpgcheck=1
gpgkey=https://packages.cloud.google.com/yum/doc/yum-key.gpg https://packages.cloud.google.com/yum/doc/rpm-package-key.gpg
EOF
Install Kubernetes in centos7/rhel7
yum install -y kubelet kubeadm kubectl
kubernetes installation on Ubuntu Setting up Kubernetes apt repository for Ubuntu
apt-get install -y apt-transport-https curl
apt-get install -y docker.io
Add kube Repo
curl -s https://packages.cloud.google.com/apt/doc/apt-key.gpg | apt-key add -
cat <<EOF >/etc/apt/sources.list.d/kubernetes.list
deb http://apt.kubernetes.io/ kubernetes-xenial main
EOF
apt-get update
Install Kubernetes in ubuntu
apt-get install -y kubelet kubeadm kubectl
Enable & start kublet
systemctl enable kubelet
systemctl start kubelet
Step-7 Verify that your Docker cgroup driver matches the kubelet config: (kube-master node)
docker info | grep -i cgroup
Cgroup Driver: cgroupfs
Configuration for cgroup drive is right in /etc/systemd/system/kubelet.service.d/10-kubeadm.conf
[Service]
Environment="KUBELET_CGROUP_ARGS=--cgroup-driver=cgroupfs"
Step-8 reload daemon and restart kubelet: (kube-master node)
systemctl daemon-reload
systemctl restart kubelet
Step-9 Flush Reset Kubernetes component (This will wipeout all the cluster config if exist any do not run this after the config create)
kubeadm reset -f
Step-10 kubernetes Network Addon setups starts here
- For flannel to work correctly,
--pod-network-cidr=10.244.0.0/16has to be passed tokubeadm init. - For Calico to work correctly,
--pod-network-cidr=192.168.0.0/16has to be passed tokubeadm init.
*Creating flannel Networks *
Note apiserver-advertise-address is the IP of the kube-master
kubeadm init --service-cidr 10.96.0.0/12 --kubernetes-version v1.11.0 --pod-network-cidr 10.244.0.0/16 --apiserver-advertise-address 192.168.1.130
You should get information back on initiating commands as a normal user, as well as the network that you need to deploy as well as how to join worker nodes to the cluster.
To start using your cluster, you need to run the following as a regular user:

  mkdir -p $HOME/.kube
  sudo cp -i /etc/kubernetes/admin.conf $HOME/.kube/config
  sudo chown $(id -u):$(id -g) $HOME/.kube/config

You can now join any number of machines by running the following on each node
as root:
Step-11 Join the Cluster (kube-minnion)
kubeadm join 192.168.1.130:6443 --token 5m8qxr.46rpadiwt8fcka0v --discovery-token-ca-cert-hash sha256:b05a0b8849a57432247c06200864f5ce99d40ffdcae965293c0026204ef33da4
Step-12 Run kubectl get nodes on the master to see this node join the cluster.
It will few seconds to get your cluster in ready state
root@kube-master:kubectl get nodes
NAME          STATUS    ROLES     AGE       VERSION
kube-master   Ready     master    2m        v1.11.0
kube-minion   Ready     <none>    47s       v1.11.0
Step-12 Apply flannel Addons
kubectl apply -f https://raw.githubusercontent.com/coreos/flannel/v0.10.0/Documentation/kube-flannel.yml
You will get output like this
clusterrole.rbac.authorization.k8s.io/flannel created
clusterrolebinding.rbac.authorization.k8s.io/flannel created
serviceaccount/flannel created
configmap/kube-flannel-cfg created
daemonset.extensions/kube-flannel-ds created
Step-13 Enable and restart kubelet engine
systemctl restart kubelet
systemctl status kubelet
Verification
Verify the Cluster Information
root@kube-master: kubectl cluster-info
Kubernetes master is running at https://192.168.1.132:6443
KubeDNS is running at https://192.168.1.132:6443/api/v1/namespaces/kube-system/services/kube-dns:dns/proxy
Verify the Services
root@kube-master:kubectl get services -n kube-system
NAME                   TYPE        CLUSTER-IP      EXTERNAL-IP   PORT(S)         AGE
kube-dns               ClusterIP   10.96.0.10      <none>        53/UDP,53/TCP   2m
Create Tokens
[root@kube-master ~]kubeadm token create
I0710 04:08:37.149017    8685 feature_gate.go:230] feature gates: &{map[]}
d49l0d.mheeem1dkrw3n436
All Service Operational
Thanku for reading !!! Give a Share for Support
Your Support Matters!
Instead of directly asking for donations, I'm thrilled to offer you all nine of my books for just $9 on leanpub By grabbing this bundle you not only help cover my coffee, beer, and Amazon bills but also play a crucial role in advancing and refining this project. Your contribution is indispensable, and I'm genuinely grateful for your involvement in this journey!
Any private key value that you enter or we generate is not stored on this site, this tool is provided via an HTTPS URL to ensure that private keys cannot be stolen, for extra security run this software on your network, no cloud dependency
Kubernetes Related Topics
Linux Related Topics
Ansible Related Topics
Openstack Articles
Applied Cryptography Topics
Web Crypto API Topics
python Cryptography Topics
PHP Cryptography Topics
Topics
For Coffee/ Beer/ Amazon Bill and further development of the project Support by Purchasing, The Modern Cryptography CookBook for Just $9 Coupon Price
Kubernetes for DevOps
Hello Dockerfile