Deploying Secure HTTPS NGINX in Kubernetes
by Anish
Posted on Tuesday August 15, 2018
Introduction
This sample chapter extracted from the book, Kubernetes for DevOps .
Get this book on Just $9 or Ask Author for Discount
In this article we will learn how to deploy nginix with modern TLS versions and Cipher suites in Kubernetes. This lab is tested on the this kubernetes versions
This example creates a nginx https service useful in verifying proof of concept, keys, secrets, configmap, and end-to-end https service creation in kubernetes
-
Definition of Modern TLS Nginx Deployment : A modern Nginx webservers should be free of these Vulnerability and only support TLS1.2
- CCS injection vulnerability
- renegotiation vulnerabilities
- CRIME vulnerability
- BREACH vulnerability
- POODLE (SSL) vulnerability
- FREAK vulnerability
- BEAST vulnerability
- LOGJAM vulnerability
- nginx certs and Keys: First Generate self signed certificate and private keys, if you have already certificate and keys, then Ignore this step
openssl req -newkey rsa:2048 -nodes -keyout nginx.key -x509 -days 365 -out nginx.crt -
Create Secrets
In the next steps created secrets for the x.509 certificate and the private keykubectl create secret generic nginx-certs-keys --from-file=./nginx.crt --from-file=./nginx.key secret/nginx-certs-keys created
-
View Secrets
kubectl describe secrets/nginx-certs-keys Name: nginx-certs-keys Namespace: default Labels: <none> Annotations: <none> Type: Opaque Data ==== nginx.crt: 1294 bytes nginx.key: 1675 bytes -
Define the Modern TLS nginx configuration file in the
default.conf
server { listen 80 default_server; listen [::]:80 default_server ipv6only=on; listen 443 ssl; root /usr/share/nginx/html; index index.html; server_name localhost; ssl_certificate /etc/nginx/ssl/nginx.crt; ssl_certificate_key /etc/nginx/ssl/nginx.key; ssl_session_timeout 1d; ssl_session_cache shared:SSL:50m; ssl_session_tickets off; # modern configuration. tweak to your needs. ssl_protocols TLSv1.2; ssl_ciphers 'ECDHE-ECDSA-AES256-GCM-SHA384:ECDHE-RSA-AES256-GCM-SHA384:ECDHE-ECDSA-CHACHA20-POLY1305:ECDHE-RSA-CHACHA20-POLY1305:ECDHE-ECDSA-AES128-GCM-SHA256:ECDHE-RSA-AES128-GCM-SHA256:ECDHE-ECDSA-AES256-SHA384:ECDHE-RSA-AES256-SHA384:ECDHE-ECDSA-AES128-SHA256:ECDHE-RSA-AES128-SHA256'; ssl_prefer_server_ciphers on; # HSTS (ngx_http_headers_module is required) (15768000 seconds = 6 months) add_header Strict-Transport-Security max-age=15768000; # OCSP Stapling --- # fetch OCSP records from URL in ssl_certificate and cache them ssl_stapling on; ssl_stapling_verify on; location / { try_files $uri $uri/ =404; } } -
The inotifywait linux command which efficiently waits for changes to files using Linux's inotify(7) interface. It is suitable for waiting for changes to files from shell scripts. It can either exit once an event occurs, or continually execute and output events as they occur
The auto-reload-nginx.sh file: This will relaod the nginx configuration whenever any change in default.conf detected. This is done by inotifywait
nginx "$@" oldcksum=`cksum /etc/nginx/conf.d/default.conf` inotifywait -e modify,move,create,delete -mr --timefmt '%d/%m/%y %H:%M' --format '%T' \ /etc/nginx/conf.d/ | while read date time; do newcksum=`cksum /etc/nginx/conf.d/default.conf` if [ "$newcksum" != "$oldcksum" ]; then echo "At ${time} on ${date}, config file update detected." oldcksum=$newcksum nginx -s reload fi done -
ConfigMaps allow you to decouple configuration artifacts from image content to keep containerized applications portable. This article provides a examples that demonstrate how to create ConfigMaps and configure Pods using data stored in ConfigMaps for nginx
Create configmap for nginx default.conf file
kubectl create configmap nginxconfigmap --from-file=default.conf configmap/nginxconfigmap created -
Verify the configmap file
kubectl describe configmap nginxconfigmap -
Here is the configuration file for the nginx-app.yaml deployment.
When referencing a configMap object, you can simply provide its name in the volume to reference it
The nginxconfigmap ConfigMap is mounted as a volume, and all contents stored in its entry are mounted into the Pod at path "/etc/nginx/conf.d". Note that this path is derived from the volume’s mountPath and the path keyed with configmap-volume
The nginx-certs-keys secret is mounted as a volume, and all contents stored in its entry are mounted into the Pod at path "/etc/nginx/ssl". Note that this path is derived from the volume’s mountPath and the path keyed with secret-volume
apiVersion: v1 kind: Service metadata: name: nginxsvc labels: app: nginx spec: type: NodePort ports: - port: 80 protocol: TCP name: http - port: 443 protocol: TCP name: https selector: app: nginx --- apiVersion: v1 kind: ReplicationController metadata: name: my-nginx spec: replicas: 1 template: metadata: labels: app: nginx spec: volumes: - name: secret-volume secret: secretName: nginx-certs-keys - name: configmap-volume configMap: name: nginxconfigmap containers: - name: nginxhttps image: ymqytw/nginxhttps:1.5 command: ["/home/auto-reload-nginx.sh"] ports: - containerPort: 443 - containerPort: 80 livenessProbe: httpGet: path: /index.html port: 80 initialDelaySeconds: 30 timeoutSeconds: 1 volumeMounts: - mountPath: /etc/nginx/ssl name: secret-volume - mountPath: /etc/nginx/conf.d name: configmap-volume -
Create the service and a replication controller using the configuration in nginx-app.yaml.
kubectl create -f nginx-app.yml service/nginxsvc created replicationcontroller/my-nginx created -
find the node port that Kubernetes is using for http and https traffic using the command
kubectl get service nginxsvc -o json
     "spec": {
            "clusterIP": "10.103.250.179",
            "externalTrafficPolicy": "Cluster",
            "ports": [
                {
                    "name": "http",
                    "nodePort": 32210,
                    "port": 80,
                    "protocol": "TCP",
                    "targetPort": 80
                },
                {
                    "name": "https",
                    "nodePort": 30115,
                    "port": 443,
                    "protocol": "TCP",
                    "targetPort": 443
                }
            ],
            ....
-
Optionally you can check the nodeport in the Master node
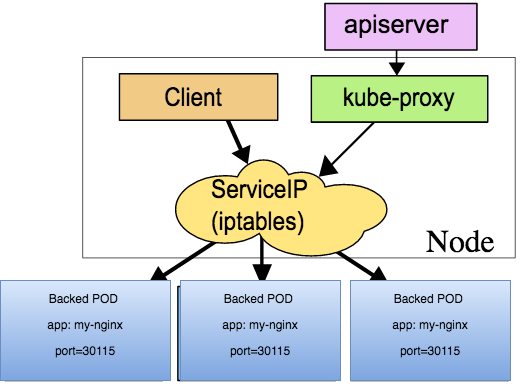
netstat -aonp | grep LISTEN | grep kube-proxy tcp 0 0 127.0.0.1:10249 0.0.0.0:* LISTEN 9087/kube-proxy off (0.00/0/0) tcp6 0 0 :::30115 :::* LISTEN 9087/kube-proxy off (0.00/0/0) tcp6 0 0 :::10256 :::* LISTEN 9087/kube-proxy off (0.00/0/0) tcp6 0 0 :::32210 :::* LISTEN 9087/kube-proxy off (0.00/0/0) -
Now your service is up and running . use your browser or type the following commands.
curl -k https://<node-ip>:<nodeport>Fetching the HTTP header Information to verify the server is up and serving the file as expected
curl -kI https://0.0.0.0:30115 HTTP/1.1 200 OK Server: nginx/1.11.3 Date: Tue, 14 Aug 2018 10:12:02 GMT Content-Type: text/html Content-Length: 804 Last-Modified: Fri, 26 Aug 2016 20:22:28 GMT Connection: keep-alive ETag: "57c0a504-324" Accept-Ranges: bytes -
Changes to nginxsvc doesn't requires any restart of the pod, for example remove the port 80 from the deployment, then remove the http port 80
kubectl edit service/nginxsvc
port: 80
                protocol: TCP
                name: http
then find the node port that Kubernetes is using, you will be seeing only https port
kubectl get service nginxsvc -o json
        "ports": [
                {
                    "name": "https",
                    "nodePort": 30286,
                    "port": 443,
                    "protocol": "TCP",
                    "targetPort": 443
                }
            ],
-
Update in configMap : This will be needed when there is any change in nginx default.conf file. This can be done through
   kubectl create configmap nginxconfigmap --from-file=default.conf -o yaml --dry-run | kubectl apply -f -
  configmap/nginxconfigmap configured
In this case the app requires to be reloaded, or destroy the pod and recreate the pod
kubectl replace --force -f nginx-app.ymlThats the purpose of the file auto-reload-nginx.sh to reload the nginx configuration if any change detected
Thanku for reading !!! Give a Share for Support
Your Support Matters!
Instead of directly asking for donations, I'm thrilled to offer you all nine of my books for just $9 on leanpub By grabbing this bundle you not only help cover my coffee, beer, and Amazon bills but also play a crucial role in advancing and refining this project. Your contribution is indispensable, and I'm genuinely grateful for your involvement in this journey!
Any private key value that you enter or we generate is not stored on this site, this tool is provided via an HTTPS URL to ensure that private keys cannot be stolen, for extra security run this software on your network, no cloud dependency
Kubernetes Related Topics
Linux Related Topics
Ansible Related Topics
Openstack Articles
Applied Cryptography Topics
Web Crypto API Topics
python Cryptography Topics
PHP Cryptography Topics
Topics
For Coffee/ Beer/ Amazon Bill and further development of the project Support by Purchasing, The Modern Cryptography CookBook for Just $9 Coupon Price
Kubernetes for DevOps
Hello Dockerfile